Creating REST API Example with Laravel 5

This walkthrough should work on a VM described here

Assuming Database configuration is already set

in app/config/database.php or .env file

cd /var/www/dev1.local/laravel

Create Database Migration

In this example I decided to create a Courses table

php artisan make:migration create_courses_table --create=courses

Database Migration
Database Migration


Navigate with SFTP to /var/www/dev1.local/laravel/database/migrations

Edit the created file 2015_11_10_152128_create_courses_table.php and add the required fields.

Create Courses Table Migration file


Adding fields for example, Course name, Classroom, Teacher

$table->string(‘course_name’);
$table->string(‘classroom’);
$table->string(‘teacher’);

Adding Fields to migration


Migrating tables to MariaDB
Database in SQLyog
Database in SQLyog


Create Models folder in  /var/www/dev1.local/laravel/app

mkdir /var/www/dev1.local/laravel/app/Models

Create Course Model

sudo vi  mkdir /var/www/dev1.local/laravel/app/Models/Course.php

Course Model
Course Model


Seeding the Database

cd /var/www/dev1.local/laravel/database/seeds

sudo vi CoursestTableSeeder.php

Courses Database Seeder


vi /var/www/dev1.local/laravel/database/seeds/DatabaseSeeder.php

Register CourseDatabaseSeeder


composer dump-autoload

php artisan clear-compiled

Run php artisan db:seed

Seeding the database
Seeding the database SQLyog
Seeded data in database

Course Controller

php artisan make:controller CourseController

Creating a Controller for Courses


sudo vi /var/www/dev1.local/laravel/app/Http/Controllers/CourseController.php

Generated Controller Stub


Implementing the Controller

Add the following uses at the top

use DB;
use Response;
use Input;
use App\Models\Course;

Implementing some of the actions. Index, Store, Show, Delete

public function index()
{
return Response::json(Course::get());
}

public function store()
{
Course::create(array(
‘teacher’ => Input::get(‘teacher’),
‘classroom’ => Input::get(‘classroom’),
‘course_name’ => Input::get(‘course_name’)
));
return Response::json(array(‘success’ => true));
}

public function show($id)
{
$course = Course::find($id);
if(!isset($course)){
return $this->respondNotFound(‘Course does not exist’);
}
return $this->respond([
‘data’ => $this->transform($course)
]);
}

Creating Routes

sudo vi /var/www/dev1.local/laravel/app/Http/routes.php

Add

Route::group([‘prefix’ => ‘/api/v1’], function()
{
Route::resource(‘course’, ‘CourseController’ );
});

save and execute

php artisan route:list

Laravel Routes
Laravel Routes

Testing the API

http://dev1.local/index.php/api/v1/courses

or

http://dev1.local/api/v1/courses

API test
API test


Next Post is about Creating Angular based Front-end to consume the above API

Installing CentOS 7, Configuring Virtual Hosts and install Laravel 5 on each host

Download CentOS 7 ISO file mount it and create a VM in Virtualbox and boot

Select the following:

  • Simple webserver
  • PHP

yum install php-common

Open Firewall for Apache and register as service

firewall-cmd –permanent –add-service=http

firewall-cmd –reload

sudo systemctl enable httpd

Install MariaDB and register as service

Check if installed

rpm -qa | grep mariadb

yum install mariadb-server

sudo systemctl enable mariadb.service

mysql

> grant all on *.* to ‘sgalea’@’%’ identified by ‘bitnami’ with grant option;

quit


sudo vi /etc/my.cnf

[mysqld]

skip-grant-tables


Enable External connections to the database

firewall-cmd –permanent –add-service=mysql

firewall-cmd –reload


yum -y install php-mysql


Install SFTP and enable as service

yum -y update

yum -y install vsftpd

Conf location: /etc/vsftpd/vsftpd.conf

sudo systemctl enable vsftpd

firewall-cmd –permanent –add-port=21/tcp

firewall-cmd –reload


Creating Virtual Hosts Settings

mkdir /etc/httpd/sites-available

mkdir /etc/httpd/sites-enabled

sudo vi /etc/httpd/conf/httpd.conf

Put the following at the end of file

IncludeOptional sites-enabled/*.conf

Esc :wq

Create a file per virtual host in /etc/httpd/sites-available

sudo vi /etc/httpd/sites-available/dev1.local.conf

<VirtualHost *:80>
ServerName  dev1.local
ServerAlias dev1.local
DocumentRoot /var/www/dev1.local/laravel/public
ErrorLog /var/www/dev1.local/logs/error.log
CustomLog /var/www/dev1.local/logs/requests.log combined
</VirtualHost>

sudo vi /etc/httpd/sites-available/dev2.local.conf

<VirtualHost *:80>
ServerName  dev2.local
ServerAlias dev2.local
DocumentRoot /var/www/dev2.local/laravel/public
ErrorLog /var/www/dev2.local/logs/error.log
CustomLog /var/www/dev2.local/logs/requests.log combined
</VirtualHost>

sudo vi /etc/httpd/sites-available/dev3.local.conf

<VirtualHost *:80>
ServerName  dev3.local
ServerAlias dev3.local
DocumentRoot /var/www/dev3.local/laravel/public
ErrorLog /var/www/dev3.local/logs/error.log
CustomLog /var/www/dev3.local/logs/requests.log combined
</VirtualHost>

https://www.digitalocean.com/community/tutorials/how-to-set-up-apache-virtual-hosts-on-centos-7

Enabling the hosts

sudo ln -s /etc/httpd/sites-available/dev1.local.conf /etc/httpd/sites-enabled/dev1.local.conf
sudo ln -s /etc/httpd/sites-available/dev2.local.conf /etc/httpd/sites-enabled/dev2.local.conf
sudo ln -s /etc/httpd/sites-available/dev3.local.conf /etc/httpd/sites-enabled/dev3.local.conf

Create folders

mkdir /var/www/dev1.local

mkdir /var/www/dev2.local

mkdir /var/www/dev3.local

sudo chmod -R 775 /var/www

Install Composer Globally

curl -sS https://getcomposer.org/installer | php
mv composer.phar /usr/local/bin/composer

Install Laravel Dependencies

ext-mbstring
sudo yum install php-mbstring

ext-mcrypt

wget http://dl.fedoraproject.org/pub/epel/7/x86_64/e/epel-release-7-5.noarch.rpm

rpm -ivh epel-release-7-5.noarch.rpm

yum install php-mcrypt*

Install Laravel

navigate to the folder where one wishes to install it in my case

cd /var/www/dev1.local
composer create-project laravel/laravel –prefer-dist

cd /var/www/dev2.local
composer create-project laravel/laravel –prefer-dist

cd /var/www/dev3.local
composer create-project laravel/laravel –prefer-dist


Storage Folder needs write permissions in SELinux

su -c "chcon -R -h -t httpd_sys_script_rw_t /var/www/dev1.local/laravel/storage/"

su -c "chcon -R -h -t httpd_sys_script_rw_t /var/www/dev2.local/laravel/storage/"

su -c "chcon -R -h -t httpd_sys_script_rw_t /var/www/dev3.local/laravel/storage/"

chmod -R 777 /var/www/dev1.local/laravel/storage/

chmod -R 777 /var/www/dev2.local/laravel/storage/

chmod -R 777 /var/www/dev3.local/laravel/storage/

  • Not sure if 777 is a good idea here

We need a location for logs

mkdir /var/www/dev1.local/logs

su -c "chcon -R -h -t httpd_sys_script_rw_t /var/www/dev1.local/logs/"

mkdir /var/www/dev2.local/logs

su -c "chcon -R -h -t httpd_sys_script_rw_t /var/www/dev2.local/logs/"

mkdir /var/www/dev3.local/logs

su -c "chcon -R -h -t httpd_sys_script_rw_t /var/www/dev3.local/logs/"


sudo systemctl restart httpd.service

Check virtualhosts

httpd -S

Add virtual hosts in host file on your host OS

On windows: C:\Windows\System32\drivers\etc

edit host file as Administrator

192.168.101.12 dev1.local
192.168.101.12 dev2.local
192.168.101.12 dev3.local

Where 192.168.101.12 is the IP of your Virtual Machine running CentOS 7

Remove index.php from the url

sudo vi /etc/httpd/conf/httpd.conf

AllowOverride Access

Change to:

AllowOverride All


Things required while debugging issues:

While debugging try without SELinux

Disable:

setenforce 0

Enable:

setenforce 1

These are not permanent they will be reset to default status after reboot.

Search string in file

grep -R ‘string’ dir/

Find IP

ip addr

Changing IP of the VM

sudo dhclient -r

sudo dhclient

__________________________________________________________________

http://stackoverflow.com/questions/17954625/services-json-failed-to-open-stream-permission-denied-in-laravel-4

Errorlogs location causes htttpd not reload

http://unix.stackexchange.com/questions/175558/apache-wont-restart-after-adding-virtualhost-conf-file-why-not

Blankscreen issue

http://stackoverflow.com/questions/20678360/laravel-blank-white-screen

ServerSetup

http://www.hexblot.com/blog/centos-7-server-installation


Next Post is about creating a REST API on Laravel 5 which can be found here

Configuring Laravel 5, FTP and MySQL on Bitnami LAMP Stack for Development

At the time of writing the Stack is running on Ubuntu 14.04 which can be downloaded from here. Since it is 64Bit make sure that Visualization is enabled in the bios settings.

Import the VM in VMware Player or Virtual box, make sure that the network settings are configured correctly so that the VM gets an IP accessible from the host machine. I personally configured it to Bridged Adapter for this exercise and have a habit of Regenerating the MAC Address.

VirtualBox Network Adapter Setup

If the VM does not get assigned an IP the configuration is wrong and I wouldn’t bother trying to fix it from inside the VM (you could) but I rather fix it from the hyper-visor settings because the stack is pre-configured to work.

Bitnami LAMP Stack with indication of IP

Login and change password


Visit the IP in the browser to check if it is working in my case http://192.168.101.12

Bitnami Main Page
Bitnami Main Page


Enabling Laravel

Bitnami LAMP Stack comes with several pre-configured frameworks of which all are disabled by default. One must enable the framework that is required. ( I am nto sure if you can enable more than one at the same time)

Steps:

cd /opt/bitnami/apache2/conf/bitnami

sudo vi bitnami-apps-prefix.conf

Accessing LAMP PHP Framework Config


Remove the hash from laravel’s line and save and close :wq

Enabling Laravel
Enabling Laravel


Restart Apache

sudo /opt/bitnami/ctlscript.sh restart apache

Restarting Apache
Restarting Apache


The location where Laravel apps Live is

/opt/bitnami/frameworks/laravel/app/http

Browser URL

http://192.168.101.12/laravel/ where 192.168.101.12 is your VM’s IP


Laravel Welcome Screen On Load


Configuring FTP

Enabling FTP for easy editing/upload of files ( Note this is a development machine for experimentation so I will not go on explaining issues with FTP and security, but you should consider reading about the risks. )


sudo vi /etc/vsftpd.conf

go to the bottom of the file and change

listen_address=127.0.0.1

to

listen_address=0.0.0.0

:wq

Listen on every available network interface

Allow connections to port 21 (FTP port)

sudo ufw allow 21

Firewall Settings
Firewall Settings

Restart FTP

sudo service vsftpd restart

Restart vsftpd service

Change bitnamiftp password

sudo passwd bitnamiftp

Change Password for FTP user

Configure Filezilla

Filezilla FTP Settings

Connected

Connected to VM
Connected to VM


Now you may play around with Laravel through FTP 🙂

Let external connections to MySQL

1)

cd /opt/bitnami/mysql

sudo vi my.cnf

Comment out

bind-address = 127.0.0.1

by putting a # infront of it and Esc :wq

Modifying my.cnf to allow external connections

2)


mysql -u root -p
grant all privileges on *.* to 'root'@'%' identified by 'password' with grant option
Granting MySQL Permissions


restart mysql

cd /opt/bitnami

sudo ./ctlscript.sh restart mysql

Restart MySQL
Restart MySQL


Open Port in firewall

sudo ufw allow 3306

Open port 3306 in firewall


Connection Settings in SQLyog


Connection Successful

Resizing a Fixed Virtual Machine VHD (VirtualBox)

Resizing a Fixed disk

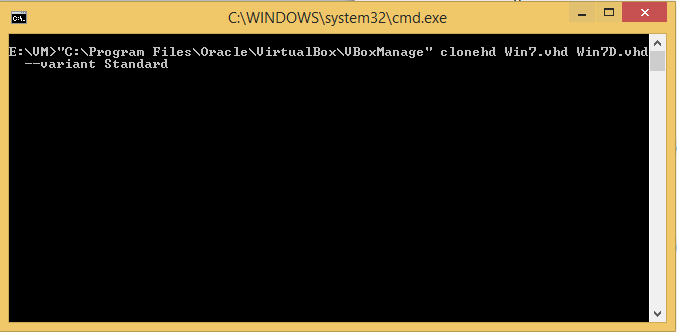
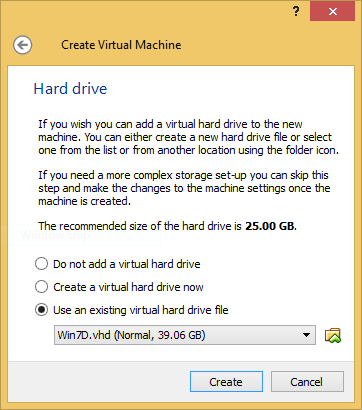
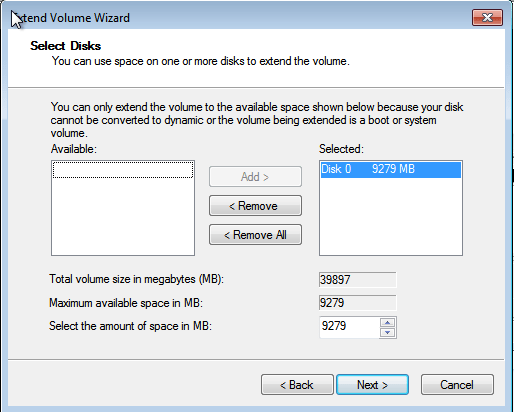
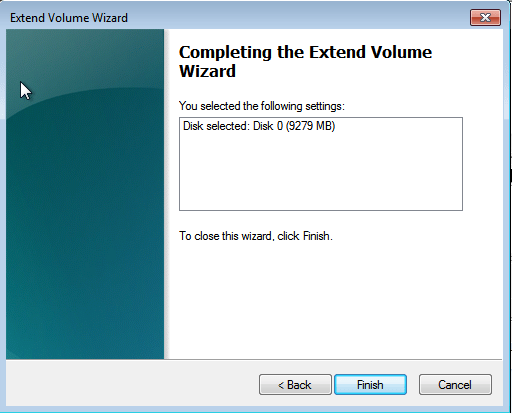
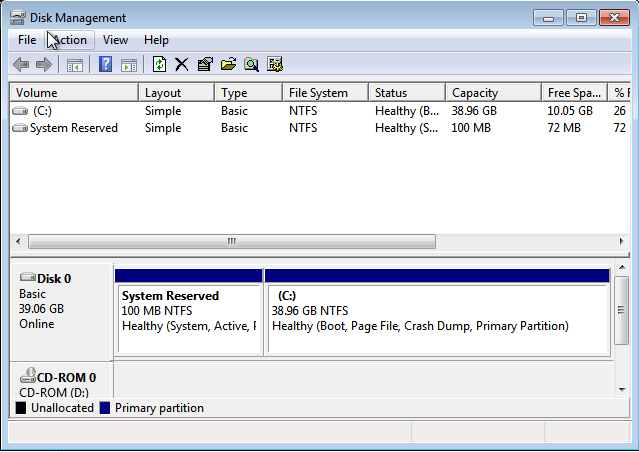
Resizing can only be done on dynamically allocated disks. So one must first convert the disk to dynamic then resize.

In reality there is no way to change between Fixed-size and dynamic disks. However one may clone the existing Virtual Machine form one format to the other. This works with VHD (Virtual Hard Disk) format

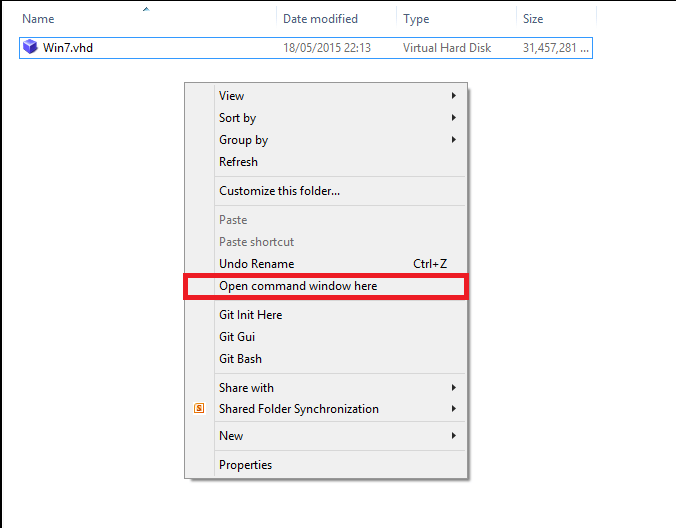
The tool one needs for the said conversion and resizing is VBoxManage.exe and this can be found in:

C:\Program Files\Oracle\VirtualBox

Dynamic to fixed Cloning

VBoxManage clonehd [Current_VHD] [New-VHD] –variant Fixed


Fixed to Dynamic Cloning

VBoxManage clonehd [Current_VHD] [New-VHD] –variant Standard


Resizing

VBoxManage modifyhd [New-VHD] –resize [megabytes]


Note that resizing only works with increasing the size

1

Open a Command Prompt near the VHD (using Shift + Right Click)

2

C:\Program Files\Oracle\VirtualBox\VBoxManage clonehd Win7.vhd Win7D.vhd –variant Standard

3

And wait for it to finish.

4

“C:\Program Files\Oracle\VirtualBox\VboxManage” modifyhd Win7D.vhd –resize 40000

5


Importing the new Virtual Machine

6

7

8

9

Locate the new VM and Create and Power it up

10

The VM will still show the old size

11 12 13 14 15 16 17 18

That’s everything that is required